A Prototype Oscillator Circuit
Let’s use AnadigmDesigner®2 to create an oscillator and demonstrate dynamic control of the oscillator frequency. If you are not already familiar with AnadigmDesigner®2 methodology for placing CAMs and changing chip settings, please study the Biquadratic Filter Tutorial.
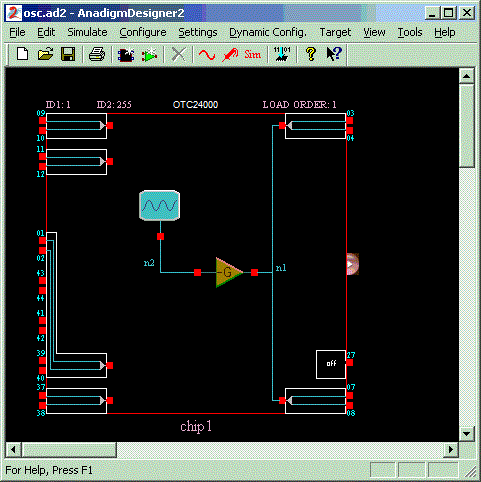
Using AnadigmDesigner®2, start with a new OTC24000 chip.
Do a left double-click inside the chip boundary. This will bring up the Chip Settings window. Set Clock 3 to 40 KHz.
Place a Sine Wave Oscillator CAM inside the OTC24000 chip. In the "Set CAM Parameters" window that pops up after placement, select CLOCKA to be clock 3 (40 kHz). Set the "Osc. Frequency" to 1 kHz. Also set the "Peak Amplitude" to 1.45. Then close the "Set CAM Parameters" window.
Also place an Inverting Gain Stage in the same OTC24000 chip and select its CLOCKA to be clock 3 (40 kHz) and set its gain to .01. Close the "Set CAM Parameters" window.
Connect the oscillator’s output to the gain stage’s input. Connect the gain stage’s output to the input of output cell 1 and also to the input of output cell 2.
The circuit should now look like this:
We are now ready to create a Visual C++ project containing functions that will allow us to exercise real-time control over the frequency and gain of the oscillator stage and the gain of the inverting gain stage.
From the "Dynamic Config." menu in AnadigmDesigner®2, select the "Visual C++ Prototype…" menu item. A "Visual C++ Prototype" window will appear. We will type in "Osc" for the "Project Name". The "Directory" will be set to "C:\Osc".
We will also select the "VC++ Version" to be "Visual C++ .NET 2003". (If you have an earlier version of the Microsoft compiler, you should choose the "VC++ Version to be consistent with your compiler version.)
We will "check" the "Open Visual Studio after project generation" checkbox so that Microsoft’s Visual Studio will be invoked with our project all ready to be compiled as soon as we "Generate" the project.
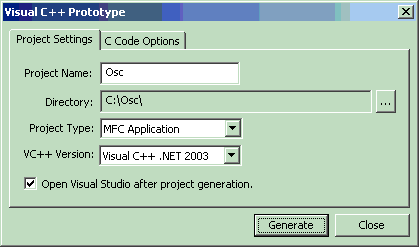
We see that there is also a "C Code Option" tab that would allow us to change the names of the generated C Code files and select their content. For this example, we will simply use the default values. (The "C Code Options" tab contains controls that are similar to the ones documented in "Generate C Code Window ".) We could, through use of the C Code Options panel, choose which functions of the CAMs in our example are included in the generated project. The default is to include them all. We will use the default for this example.
Now left-click the "Generate" button and wait a moment.
.
.
.
Visual Studio should appear and our new Osc "Solution" or "Project" should be ready for use. (Note: Microsoft changed terminology recently. What used to be a "project" is now called a "solution". In the .NET versions of the compiler, the suffix of a "project" or "solution" file is now ".sln" instead of the previously used ".dsw".)