Generating a Visual C++ Project
After completing your circuit schematic in AnadigmDesigner®2, choose Dynamic Config. -> Visual C++ Prototype… from the main AnadigmDesigner®2 menu. This will bring up the Project Settings Tab.
Project Settings Tab
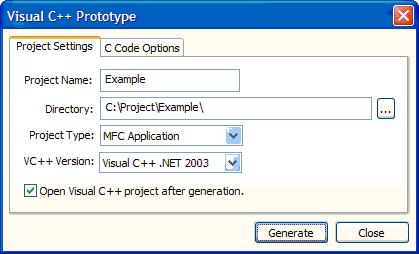
The project settings tab contains all the settings related to the Visual C++ project that will be generated.

·Project Name – The name of the Visual C++ Project to create. This does not affect the names of the generated C Code files.
·Directory – The directory in which to create the project. The project name will automatically be added to the chosen directory name. The tool will not allow you to create a project in a directory that already contains Visual C++ project files.
·Project Type – The type of Visual C++ project to generate. The only option is MFC.
·VC++ Version – The version of the Microsoft Visual C++ compiler that the project files should be generated for. The tool supports Microsoft Visual C++ 6.0, Microsoft Visual C++ .NET 2002, and Microsoft Visual C++ .NET 2003.
·Open Visual C++ project after generation. – Selecting this option will cause the tool to open the generated project in Visual C++ after it is generated.
C Code Options Tab
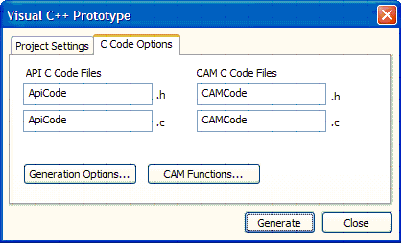
The C Code options tab controls the various options of the Okika C Code files that are generated.

·C Code File Names – Controls the names of the C Code files that are generated.
·Generation Options – Opens the C Code Generations Options window which controls various aspects of the generated code, such as naming conventions and memory allocation.
·CAM Functions – Opens the CAM C Code Functions window, used for controlling which C Code functions for which CAMs will be generated.
Previous: Generating a Visual C++ Project Next: What is Generated